System time
Applications in industrial automation depend on real-time operation, so it is crucial to always have your device set to an accurate date and time. Therefore, your PLCnext Control device contains a real-time clock (RTC).
Factory default
PLCnext Control devices (except AXC F 1252) are usually set by default to UTC0 which is UTC±00:00 of the Coordinated universal time (UTC). So when starting up initially, the system time will be according to UTC±00:00.
Exception: The real-time clock of PLCnext Control AXC F 1252 comes without a buffer that would allow keeping the date and time settings. An automated time synchronization is highly recommended.
UTC0.Adjusting date and time
Most users will have to adjust the real-time clock on the device at minimum once. Depending on device and on the precision you need for your application, that might be a recurring task.
There are different methods available for setting the real-time clock on your device:
| You can set the date and time on the device, or you can synchronize the device's clock with a computer. |
This way, the UTC0 value on your device is replaced by a specific date and time. It's improbable to set up other connected devices to the exact same date and time by this method, and there's no adjustment for time deviation due to the hardware and environmental influences. |
| You can set your device to a local time zone. | This way, the device's clock can regularly adjust to and from daylight saving time (DST) at that location. But even with the connected systems all set up by this method, they would be just approximately at the same date and time. There's no adjustment for time deviation due to the hardware and environmental influences. |
| You can connect the device to an NTP server that regularly synchronizes the device to a reference clock. | This approach allows selecting a set of network time protocol (NTP) servers to synchronize the real-time clock at a defined cycle. The current date and time for your device can be calculated with high precision, even adjusting for millisecond-level network delay. |
Setting date and time manually
Via PLCnext Engineer
Setting a specific date and time
- Connect PLCnext Engineer with the device as an
adminuser. - In the PLANT area, double-click on the PLCnext node.
↪ The PLCnext device editor group opens. - In the Online Parameters editor, select the Real time clock view.
- To read the date and time from the device, click the
 button.

- Change the date and time in the input fields (see the circled ℹ for the input format).
- To transfer the date and time to the device, click the
 button.
↪ The date and time are transferred to the connected PLCnext Control device.
Synchronizing with a computer
- Connect PLCnext Engineer with the device as an
adminuser. - In the PLANT area, double-click the device node.
- In the Cockpit toolbar, click the
 button.

↪ The computer's date and time are transferred to the connected PLCnext Control device.
Via shell commands
- Connect via SSH to the device as an
adminuser. - Open the shell on your computer.
- Request the current system time via the
datecommand. - To set the date and time on your device, enter the shell command
sudo date -s "YYYY-MM-DD hh:mm:ss"with the date and time.
↪ The date and time are transferred to the connected PLCnext Control device.
Setting a time zone
Via the PLCnextBase library
Another way to set the system time is the PLCnextBase library, provided in the PLCnext Store for free and without needing a license. The PLCnextBase library comes with instructions for importing and setting up, as well as detailed descriptions of the IEC 61131‑3 interface and all its components. After importing the library into PLCnext Engineer, it provides several functions, function blocks, and programs that are helpful in developing PLCnext-based automation solutions.
For the system time, the PLCnextBase library depends on the native Linux® features. After importing this library in PLCnext Engineer, you can work with local date and time settings by reading the timezone along with the local offset to UTC±00:00, and automatically switch to and from that timezone's daylight saving time (DST).
Managing date and time via an NTP server
It is possible to connect the device to one or more network time protocol (NTP) servers. NTP server connections can be configured via Web‑based Management, PLCnext Engineer or via RSC services.
From firmware 2025.0
A chrony daemon is integrated into the device's operating system. Settings are done via the Date & time WBM 2 page and saved in the chrony.conf file on the device. For features of the chrony daemon and differences to the former ntp daemon see the chrony project website.
Note: During a firmware update to 2025.0 or newer, a pre-existing ntp.conf file on the device is not converted into a chrony.conf file.
Up to firmware 2024.6
An NTP daemon is integrated into the device's operating system. Settings are done via the Date & Time WBM page and saved in the ntp.conf file on the device.
Setting up a connection to an NTP server
Via Web-based Management
Available from 2022.0 LTS
- For devices with firmware releases 2025.0 and newer: on the Date & Time WBM 2 page.
- For devices with firmware releases 2022.0 LTS up to 2024.6: on the Date and Time WBM page.
Via PLCnext Engineer
- In the PLANT area, double-click on the PLCnext node.
- In the Online Parameters editor, select the NTP view.
- Enter the URLs for up to three NTP servers in the input field (separated by spaces).
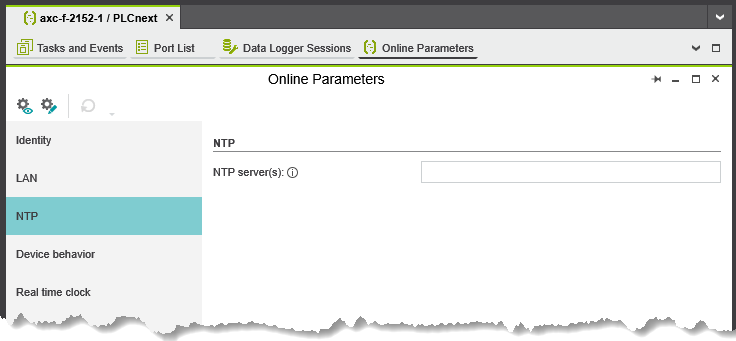
- Reboot the PLCnext device for changes to take effect.
Via shell commands
Available only with firmware 2022.0 LTS up to 2024.6
A network time protocol daemon (ntpd) is integrated into the device's operating system.
- Connect to the device as an
adminuser. - Navigate to the /etc/ directory.
- In the ntp.conf file, specify the NTP servers' IP addresses and names.
- To restart the NTP daemon, execute the command
sudo /etc/init.d/ntpd.
- The firmware already contains NTP utilities (e.g.
ntpqandntpdc) for diagnostic and monitoring purposes. - Find a general overview to the
ntpdfeatures in the developer's introduction. - Find a detailed description of the configuration options in the developer's documentation.
See also