Security - User Authentication page
Valid from firmware 2019.0 LTS up to 2024.6- for firmware 2025.0 or newer see WBM 2: Security - User management
Accessibility
|
This WBM page is accessible with user role:
|
How to get into the WBMHow to get into the WBM
Establishing a connection to the Web-based Management (WBM):
- Open a web browser on your computer.
- In the address field, enter the URL https://<IP-address-of-the-controller>/wbm,
for example: https://192.168.1.10/wbm.
For further information, see WBM.
Show WBM page in former firmware releasesShow WBM page in former firmware releases
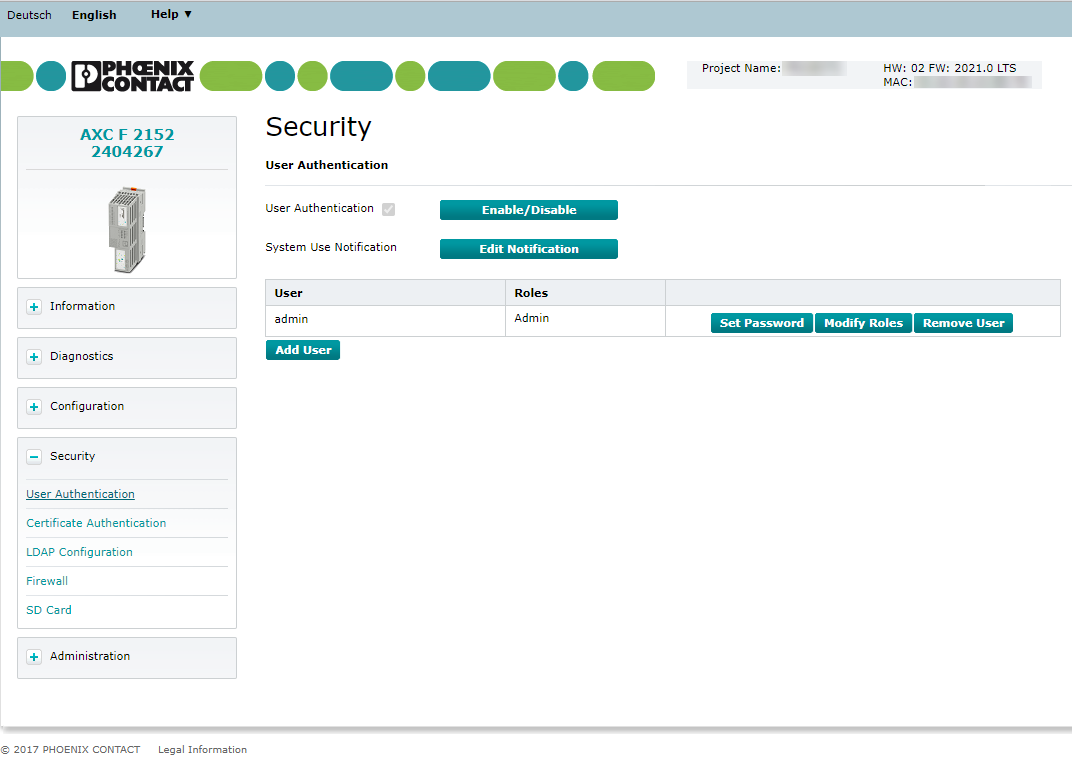
General configuration
User authentication
If User Authentication is enabled in the WBM then authentication with a user name and password is required for access to certain components of the controller and certain functions in PLCnext Engineer.
If User Authentication is disabled in the WBM then authentication is not necessary to access the WBM, the OPC UA® server of the controller, or to access the controller using PLCnext Engineer.
But even if the User Authentication in the WBM is disabled the admin user can log in via SFTP and get access to the file system, or can issue commands via SSH.
User authentication is enabled by default. In the delivery state, the admin user is already created with administrator rights, and a unique default password is printed on the controllers' housing.
Security note: Use the default
admin user password only for initial access and change it as soon as possible!
The modified administrator credentials are stored in the overlay file system which is usually located on the internal flash memory; but if you operate the controller with an SD card, the overlay file system is located on the SD card.
Recommended:
- If operating the controller with an SD card, make sure to restrict physical access to the control cabinet; and also restrict access to the SD card once it has been taken off the controllers' card slot.
 Security note: Enabled user authentication only provides a limited degree of protection against unauthorized network access. Due to the communication interfaces of the controller, the controller should not be used in security-critical applications unless additional security appliances are set. For all details, see the PLCnext Security Info Center.
Enabling/disabling user authentication
To enable/disable user authentication, proceed as follows:
- Click on the button next to the User Authentication checkbox.
The Enable/Disable User Authentication dialog opens.

- To enable user authentication, enable the User Authentication checkbox.
- To disable user authentication, disable the User Authentication checkbox.
- Click the button to apply the setting.
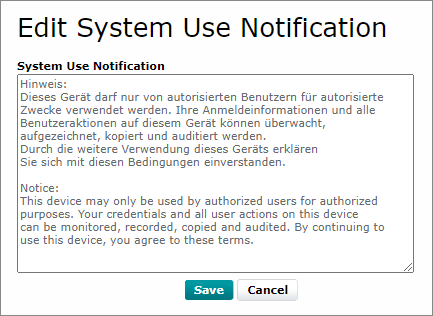
System use notification
Available from firmware 2021.0 LTS
The system use notification is displayed each time a user wants to log on to the controller via WBM, PLCnext Engineer or via SFTP and SSH. The system use notification is independent of the language of the user interface in WBM and PLCnext Engineer. You should therefore take all required languages into account when editing.
To edit the system use notification, proceed as follows:
- Click the button.
- Edit the System Use Notification in the input window that opens.
- Confirm the entry by clicking the button.
The text is then transferred to the controller and stored.
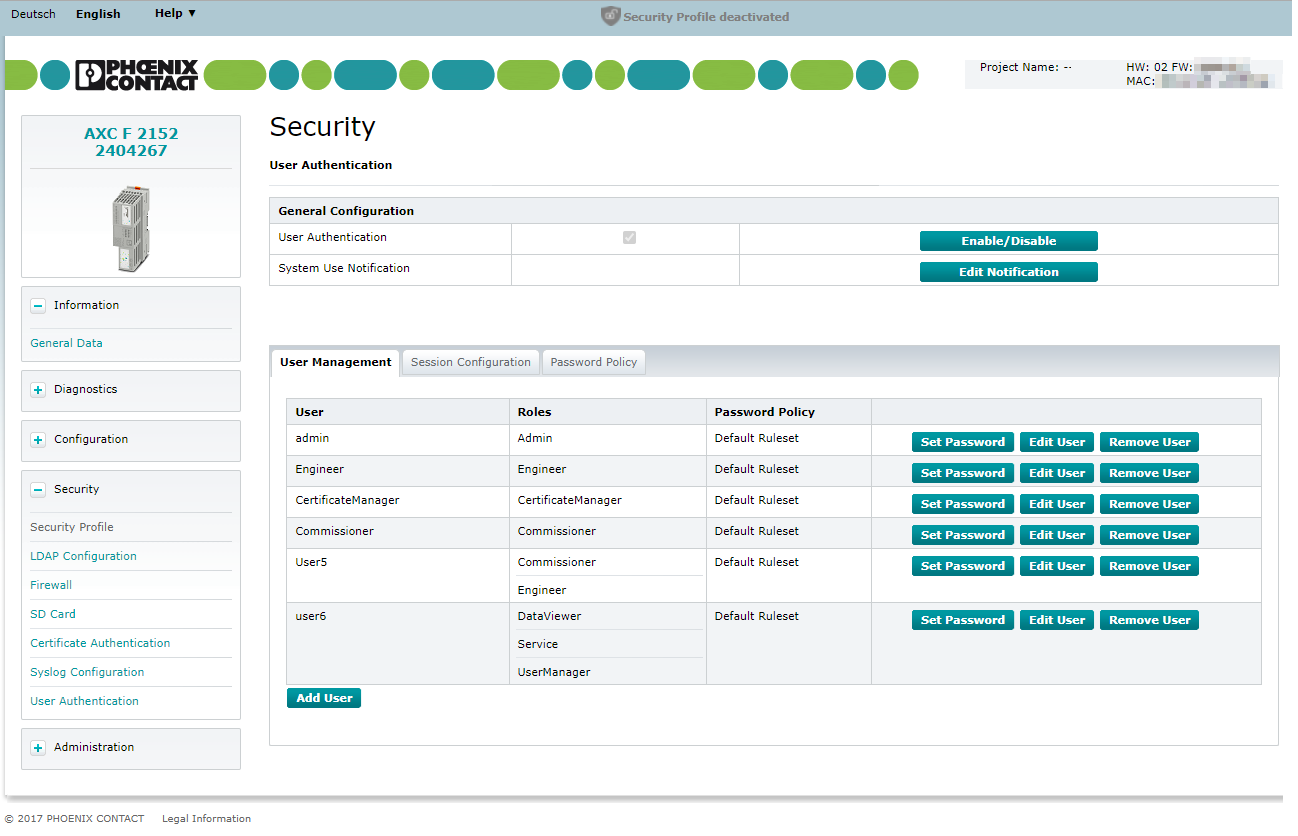
admin.User Management tab
Available from firmware 2022.0 LTS
Via the User Management tab of the firmware 2022.0 LTS or newer, the access data of all users who are authorized to access the controller is managed, and the required access permissions are assigned to each user.
Storage for user data
The access data of all newly created users is stored in the overlay file system which is located on the internal flash memory. If you operate the controller with an SD card, the overlay file system is located on the SD card. If an SD card is inserted into another controller of the same type, the access data stored on the SD card is used for access to that other controller.
Before inserting the SD card into another controller please note:
If you have changed the administrator credentials after logging into WBM for the first time, then the modified access data stored on the SD card will be used for access to the controller. In this case, it is no longer possible to log in with the admin user name and the default password printed on the controllers' housing.
User management table
- The User column shows all existing user names. From firmware release 2022.6, can also show warning icons on the right side of a user name:
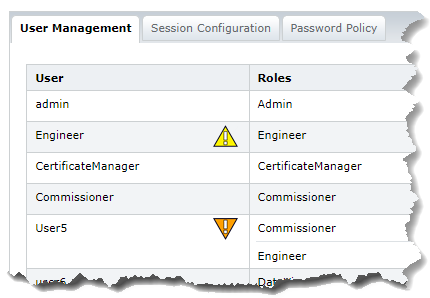
 A warning indicates that a user password will expire soon.
 An urgent warning indicates that a user password has already expired.
- The Roles column shows all assigned User roles for each user.
- The Password Policy column shows the currently set Password complexity rule set for each user.
- The rightmost columns contains the buttons for the user management functions that are described in the sections below.
- For firmware up to 2021.9 the maximum session count is set to 32.
- From firmware 2022.0 LTS, the maximum count can be set by admin users (see Session Configuration tab) so it might be exceeded earlier or later.
Adding a user
Proceed as follows to add a user:
- Click on the button below the table.
The Add User dialog opens.

- Enter the user name and password into the respective input field;
note the length limitation of 63 bytes* for user names, and 127 bytes* for passwords.
From firmware 2022.0 LTS, Password complexity rules apply additionally.
Observe the following rules when assigning the user name (otherwise the new user will be rejected):- It must consist of at least one character
- It must not be longer than 63 bytes (excluding terminating character at position 64)
- It must not contain these characters: \ ( ) $
- To add the user in the user manager, click on the button.
* The characters are encoded using UTF-8 so the number of bytes used for a character depends on which character is entered. Characters can be coded with one byte (e.g. letters a-z or digits 0-9) and up to four bytes (e.g. special characters, umlauts, etc.). The length limitation therefore limits the number of bytes, not the number of characters.
Changing a user password
- Click on the button in the line of the desired user on the User Authentication page.
The Set User Password dialog opens.

- Enter the new password in the New Password and Confirm Password input fields;
note the length limitation of 127 bytes* for passwords.
From firmware 2022.0 LTS, Password complexity rules apply additionally. - To save the new password, click on the button.
* The characters are encoded using UTF-8 so the number of bytes used for a character depends on which character is entered. Characters can be coded with one byte (e.g. letters a-z or digits 0-9) and up to four bytes (e.g. special characters, umlauts, etc.). The length limitation therefore limits the number of bytes, not the number of characters.
Modifying user roles
You can select one or more user roles with different permissions for each user.
These permissions control access to aspects of the controller:
- Access to the file system of the SD card in the controller (if an SD card is used)
- Access to the controller by means of PLCnext Engineer or via Secure Shell (SSH)
- Access to the embedded human-machine interface (eHMI) set up with PLCnext Engineer
- Access to the pages of the Web-based Management (WBM) on the controller
- Access to the OPC UA® server on the controller
For two controllers in a system redundancy context, user roles set on the primary controller are automatically synchronized with the backup controller.
To assign one or more user roles to a user, proceed as follows:
- In the table row of the user in question, click on the button.
TheEdit User Configuration dialog opens.
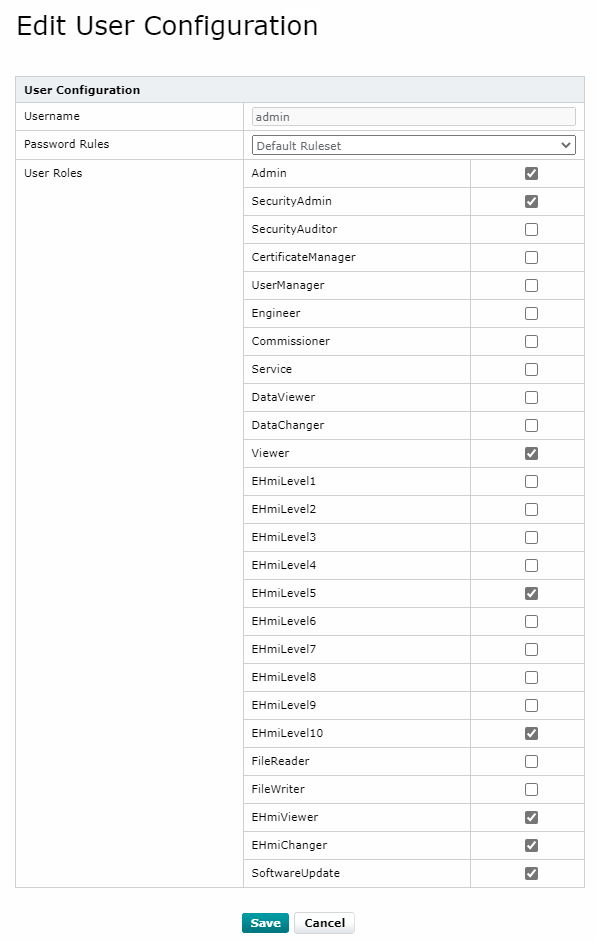
- Enable/disable the checkbox behind the user role(s) that you would like to assign/retract.
- Click on the button to save the selected user role(s) for the user.
- In the table row of the user in question, click on the button.
The Modify Roles dialog opens.
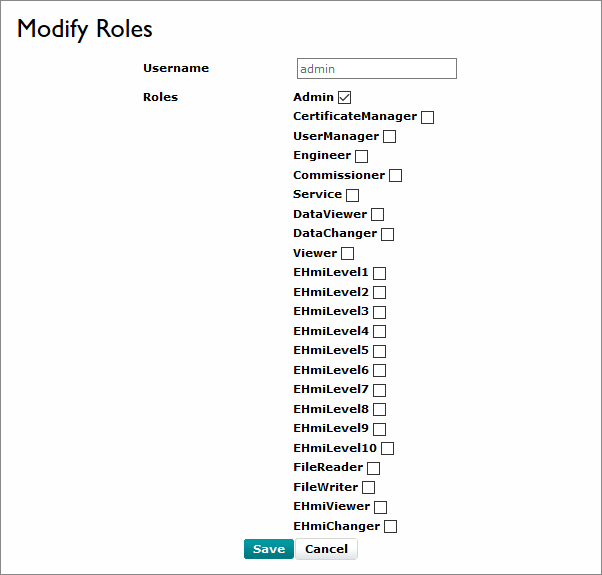
- Enable/disable the checkbox of the user role(s) that you would like to assign/retract.
- Click on the button to save the selected user role(s) for the user.
You can manage access permission to the PLCnext Engineer HMI application via the EHmiLevel1...EHmiLevel10, EHmiViewer and EHmiChanger user roles. The assigned user roles specify if and to what extend a user can read and write to the HMI application.
For detailed information on restrictions in a PLCnext Engineer HMI application as well as on handling HMI user roles, please refer to the PLCnext Engineer help function.
User roles and their assigned access permissions in the various applications
The following overview shows the user roles implemented in the firmware and their access permission for different purposes. Some user roles have been introduced only with recent firmware updates.
Note: User roles that are not mentioned in a table do not have any access permission in the regarding context.
Web-based Management (WBM)
In addition, some WBM pages could have been deactivated by settings in the System Services.
| WBM pages | Access permission for: | User role | ||||||||||
 |
 |
 |
 |
 |
 |
 |
 |
 |
 |
 |
||
| Information or Overview section | General Data | ✓ | ✓ | ✓ | ✓ | ✓ | ✓ | ✓ | ✓ | ✓ | ✓ | ✓ |
| Network configuration | ✓ | ✓ | ✓ | ✓ | ✓ | ✓ | ✓ | ✓ | ✓ | |||
| Cockpit | ✓ | ✓ | ✓ | ✓ [1] |
✓ [1] |
✓ [2] |
✓ [2] |
✓ [2] |
✓ [1] |
✓ [1] |
✓ [1] |
|
| Diagnostics section | PROFINET | ✓ | ✓ | ✓ | ✓ | ✓ | ✓ | ✓ | ✓ | ✓ | ✓ | ✓ |
| Local Bus | ✓ | ✓ | ✓ | ✓ | ✓ | ✓ | ✓ | ✓ | ✓ | ✓ | ✓ | |
| Notifications | ✓ | ✓ | ✓ | ✓ | ✓ | ✓ | ✓ | ✓ | ✓ | ✓ | ✓ | |
| Integrated UPS | ✓ | ✓ | ✓ | ✓ | ✓ | ✓ | ✓ | ✓ | ✓ | ✓ | ✓ | |
| Configuration section | Network - LAN Interfaces tab |
✓ | ✓ | ✓ read- only |
✓ read- only |
✓ read- only |
✓ read-only |
|||||
| Network - Netload Limiter tab |
✓ | ✓ | ✓ read- only |
✓ | ✓ read, reset |
✓ read, reset |
||||||
| Date and Time | ✓ | ✓ | ||||||||||
| System Services | ✓ | ✓ | ||||||||||
| PLCnext Store | ✓ | ✓ | ||||||||||
| Proficloud (legacy platform) |
✓ | |||||||||||
| Proficloud Services (V3 platform) |
✓ | ✓ | ||||||||||
| SPLC | ✓ | ✓ | ✓ | ✓ | ||||||||
| Fan Control | ✓ | ✓ | ||||||||||
| Web Services | ✓ | ✓ | ||||||||||
| Security section | Security Profile | ✓ | ✓ | |||||||||
| User Authentication | ✓ | ✓ | ✓ | |||||||||
| LDAP configuration | ✓ | ✓ | ✓ | |||||||||
| Firewall | ✓ | ✓ | ||||||||||
| SD Card | ✓ | ✓ | ||||||||||
| Certificate Authentication | ✓ | ✓ | ✓ | |||||||||
| Syslog Configuration | ✓ | ✓ | ||||||||||
| Administration section | Firmware Update | ✓ | ✓ | |||||||||
| PLCnext Apps | ✓ | ✓ | ✓ | |||||||||
| License Management | ✓ | ✓ | ||||||||||
PLCnext Engineer
Note: User roles that are not mentioned in a table do not have any access permission in the mentioned features in PLCnext Engineer.
| PLCnext Engineer | Access permission for: | User role | ||||||||||
 |
 |
 |
 |
 |
 |
 |
 |
 |
 |
 |
||
| PLCnext Engineer user interface |
View values in the cockpit (e.g., utilization) | ✓ | ✓ | ✓ | ✓ | ✓ | ✓ | ✓ | ✓ | |||
| Transfer a project to the controller | ✓ | ✓ | ✓ | |||||||||
| Start (cold/warm restart) or stop the controller | ✓ | ✓ | ✓ | ✓ | ||||||||
| Restart the controller (reboot) | ✓ | |||||||||||
| Reset the controller to default setting type 1 | ✓ | |||||||||||
| View online variable values | ✓ | ✓ | ✓ | ✓ | ✓ | ✓ | ✓ | |||||
| Overwrite variables | ✓ | ✓ | ✓ | ✓ | ||||||||
| Set and delete breakpoints | ✓ | ✓ | ✓ | |||||||||
| Download safety-related programs to the controller | ✓ | ✓ [4] |
✓ [5] |
|||||||||
| Start or stop safety-related programs | ✓ | ✓ [4] |
✓ [5] |
|||||||||
| Debug safety-related programs | ✓ | ✓ [4] |
✓ [5] |
|||||||||
| PLCnext Engineer HMI application |
View online variable values | ✓ | ✓ | ✓ | ✓ | |||||||
| Overwrite variables | ✓ | ✓ | ||||||||||
- As of firmware 2023.0 LTS, safety permissions for the Engineer user role are always enabled. As of the firmware 2023.0.1 LTS hotfix: if the Security Profile is enabled, safety permissions for the Engineer user role are disabled. If needed, use the SafetyEngineer user role in addition. See detailed description of combined safety user roles.
- Do not use this user role alone. This role is designed for use as an add-on to other user roles, e.g. Engineer. See detailed description of combined safety user roles.
Applications and services
Note: User roles that are not mentioned in a table do not have any access permission in the mentioned applications and services.
| Application or service |
Access permission for: | User role | ||||||||||
 |
 |
 |
 |
 |
 |
 |
 |
 |
 |
 |
||
| SD card, parameterization memory |
SFTP access to the file system with an SFTP client [6] |
✓ | ||||||||||
| Shell | SSH access to the shell [6] |
✓ | ||||||||||
| By means of dedicated tools | Update safety-related firmware on the controller | ✓ | ✓ | |||||||||
| OPC UA® access by means of a client application | View online variable values | ✓ | ✓ | ✓ | ✓ | ✓ | ✓ | ✓ | ||||
| Overwrite variables | ✓ | ✓ | ✓ | ✓ | ||||||||
| Read files (OPC UA file transfer must be enabled via PLCnext Engineer) |
✓ | ✓ | ||||||||||
| Write files (OPC UA file transfer must be enabled via PLCnext Engineer) |
✓ | ✓ | ||||||||||
| Update firmware on the controller | ✓ | ✓ | ||||||||||
| Device and Update Management (DaUM) | Update firmware, software and projects | ✓ | ||||||||||
Removing a user
- On the User Authentication page, click the button in the line of the user to be removed.
The Remove User dialog opens with this user's name already pre-entered.

- Click on the button to delete that user permanently.
Session Configuration tab
The Session Configuration tab is available from firmware version 2022.0 LTS
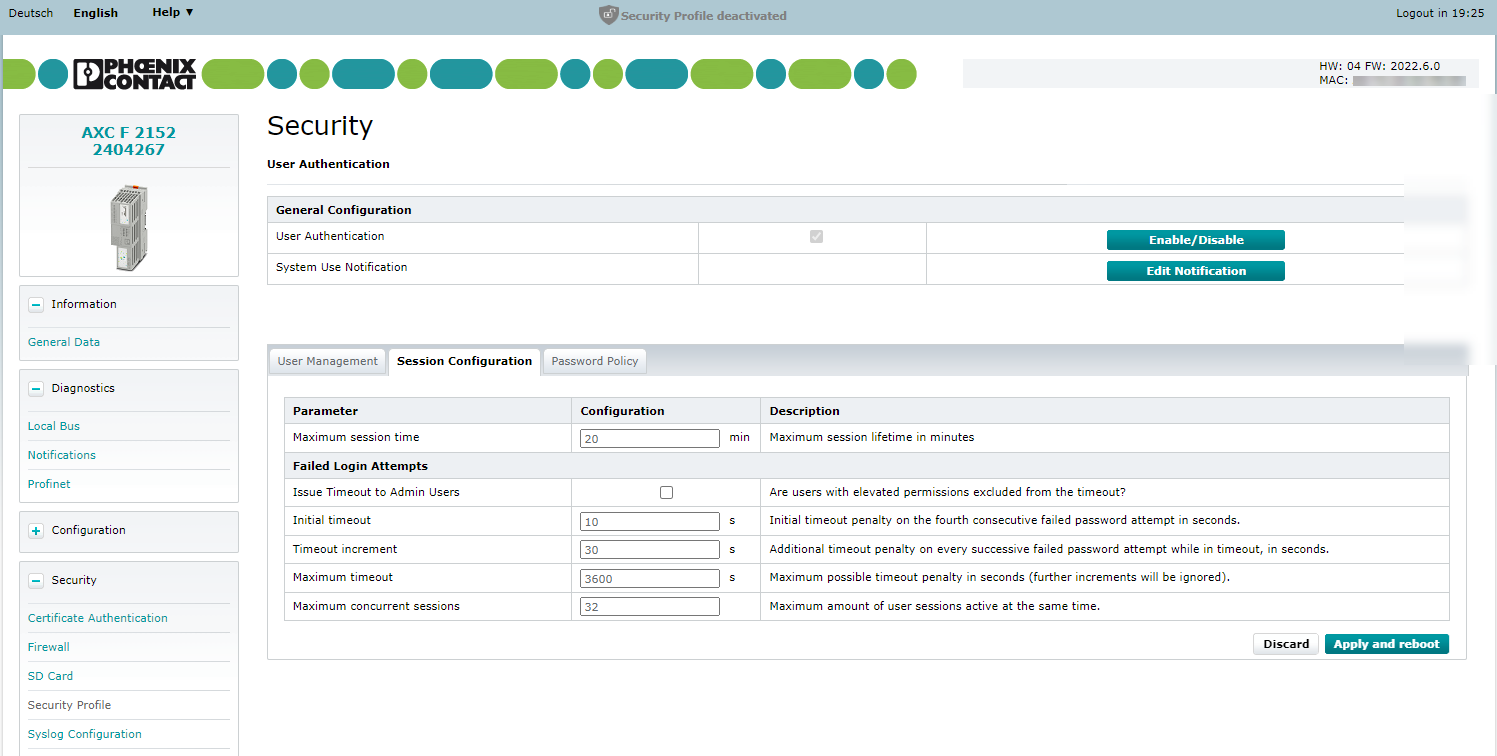
Show Screenshot from 2022.0 LTS to 2022.3Show Screenshot from 2022.0 LTS to 2022.3
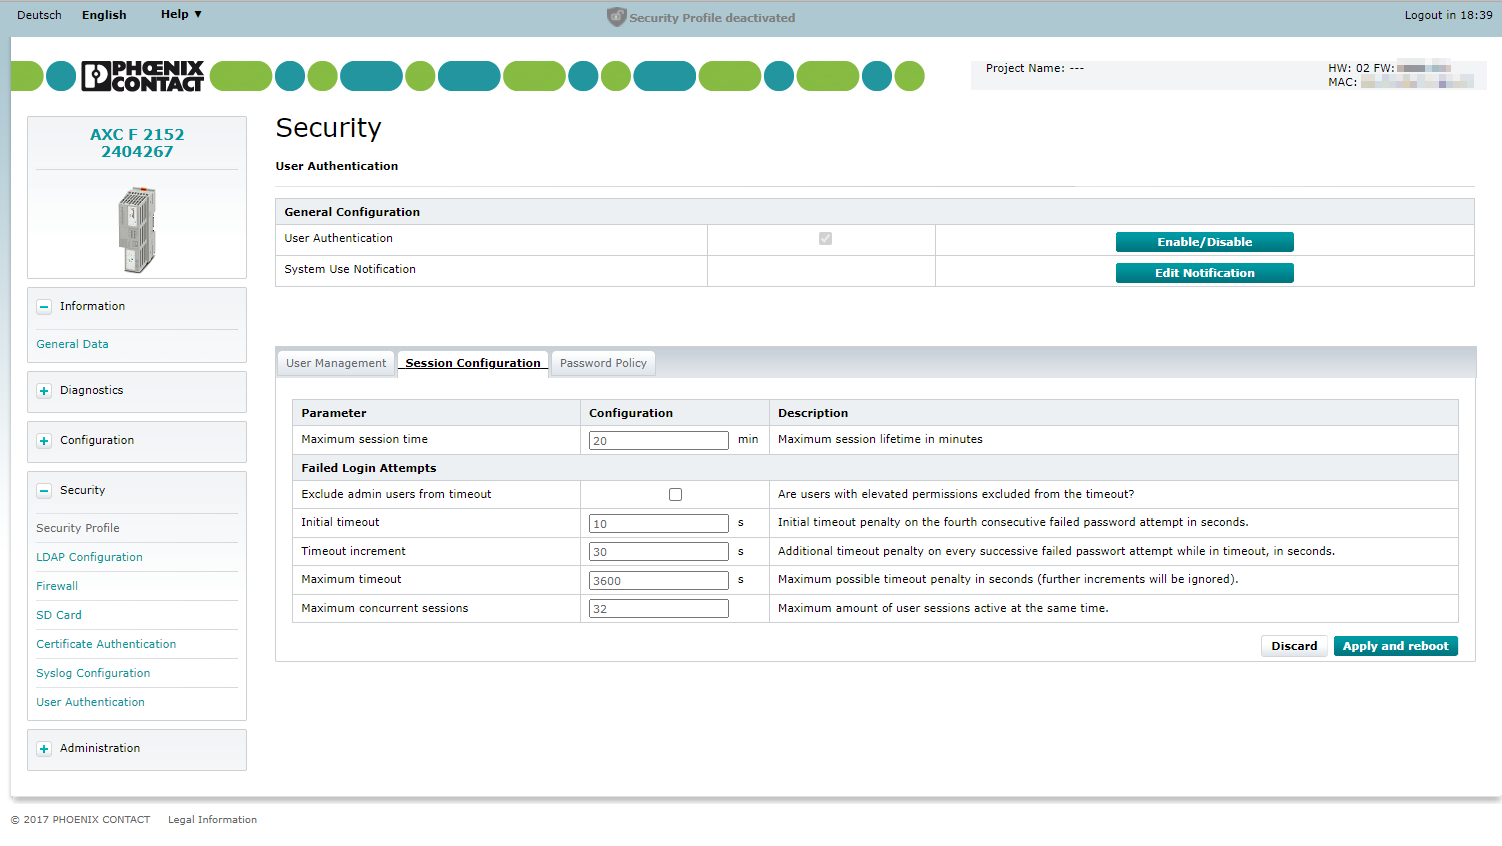
Configuring parameters
In the Session Configuration tab, thorough settings for the user sessions can be made in order to allow admins to set preferences for their organisation's needs. User sessions in this context refers to all sessions which are managed by the User Management, such as access to the WBM and RSC services.
 Security note: Limited session time and limited concurrent sessions, as well as incremented penalties on repeated login trials, are features to enhance the security of your controllers. When changing these settings, do it with a "security first" approach. For all details, see the PLCnext Security Info Center.
The following parameters can be configured:
- Maximum session time:
Numeric value,1minute to the maximum ofUINT32; default: 20 min
Note: Do not use0as a value here! That way you would lock out everyone from the WBM forever. - Exclude admin users from timeout:
Boolean value, default:false
Enabling this feature by setting this value totrueexcludes admin users from timeout penalties when retrying to login more than 3 times. - Initial timeout, Timeout increment, Maximum timeout:
Numeric values, 0 seconds (no timeout) to the maximum ofUINT32; default values:- Initial timeout 10 s
- Timeout increment 30 s
- Maximum timeout 3600 s
- Maximum concurrent sessions:
Numeric value,2to the maximum ofUINT32, default: 32 sessions.Note: For security reasons, this value should always be as low as possible. But keep in mind that each communication to the PLC needs its own session, even the WBM access to change this value! To get as close to the minimum as viable, proceed as follows:- For counting concurrent sessions in your project, enable the Enhanced Debug Log.
- Run the project, then open the Output.log and count the necessary connections to the PLC.
- Add 2 sessions to that value for preventing from locking yourself out - that's the bare minimum.
- Disable the Enhanced Debug Log afterwards so it cannot influence the timing of running applications.
Applying changes and rebooting
All changes made in the Session Configuration tab are saved only with pressing the button under the table. The controller will only reboot if all settings can be set in the system error-free.
If an error occurs, the firmware notifies only for the first error, but all touched settings are set back.
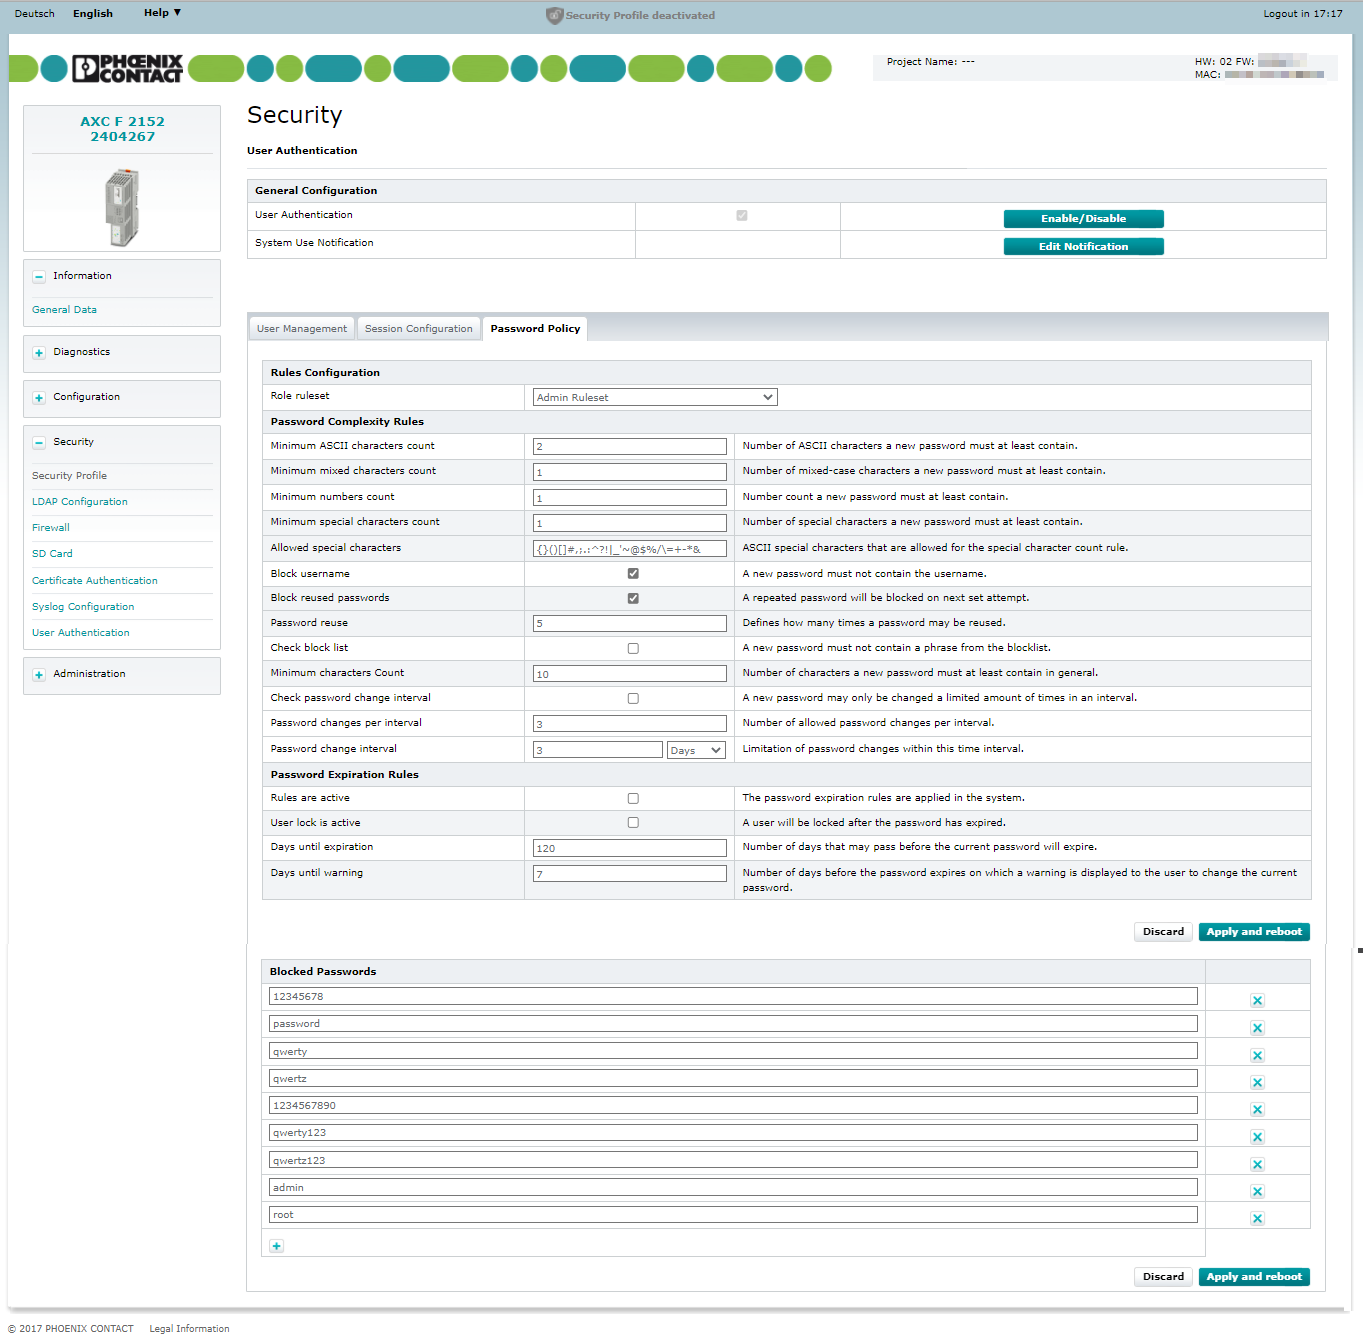
Password Policy tab
Available from firmware 2022.0 LTS
In the Password Policy tab, all restrictions for user passwords can be set up, grouped as specific rulesets for users on the same trust level. See Password complexity rules for all further details.
Show a screenshot for this tabShow a screenshot for this tab
